So, you’ve found mold in your home. If you’re like most homeowners, you’re probably anxious and unsure about what happens next – especially when the pros show up.
Professional mold removal usually means a full inspection, sealing off affected areas, getting rid of contaminated stuff, cleaning with special tools, and fixing things back up. Depending on how bad the situation is, you might be looking at a few hours or a few days for the whole process.
Knowing what’s coming can help you feel a bit more in control. If you understand the steps, you’ll probably find the whole thing less stressful.
Key Takeaways
- Professional mold removal covers inspection, containment, removal, cleaning, and restoration to get rid of mold safely.
- The timeline ranges from hours to days, depending on how much mold you’re dealing with.
- Knowing what to expect at each step really does make the process smoother.
Understanding the Need for Professional Mold Removal
Mold exposure isn’t just gross – it can seriously mess with your health and wreck your house. Bringing in the pros keeps your family safer and helps you avoid pricey repairs down the road.
Need a Home Fix – Emergency or Routine?
From leaks and no-heat nights to simple tune-ups, our 24/7 hotline connects you with trusted local pros in minutes.
Health Risks and Mold Exposure
Breathing in mold spores can set off allergies and make asthma worse. It’s not something you want to ignore.
Common symptoms include:
- Coughing and sneezing
- Throat irritation
- Eye irritation
- Skin rashes
- Headaches
If your immune system isn’t strong – kids, older adults, or anyone with health issues – you’re at a bigger risk for bad reactions. Sometimes, just being at home can make you feel lousy if the air quality drops because of mold.
Some molds even release toxins. Sounds scary, right? That’s why pros make sure they get rid of all the dangerous stuff.
Potential for Structural Damage
Mold loves to eat building materials. It goes after wood, drywall, and anything organic, slowly weakening your home’s bones.
Wood rot can get pricey fast. If mold attacks beams or floors, you might be facing thousands in repairs.
Drywall doesn’t stand a chance either – it’ll crumble and need replacing if mold gets in. And it doesn’t stop there.
Mold can ruin:
- Insulation
- Carpeting
- Furniture
- Belongings
Getting help early can save you from a much bigger headache as well as cost savings later on.
Initial Mold Assessment and Inspection
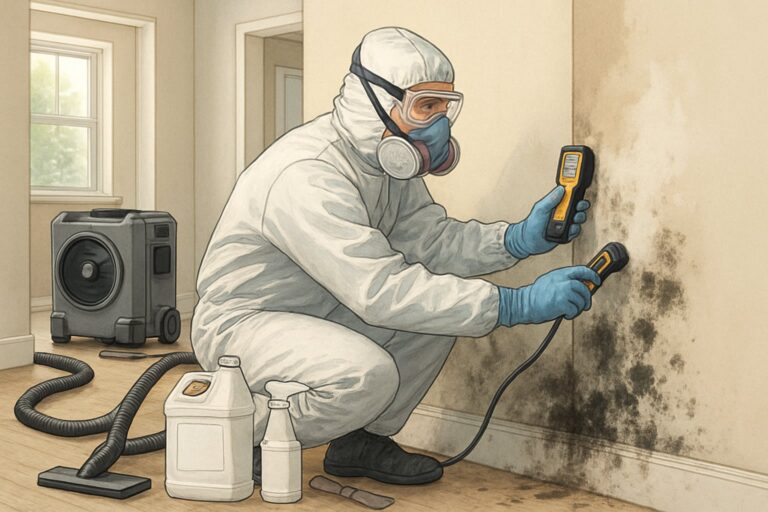
First up, the pros will do a deep dive inspection to spot all the mold and figure out where the moisture’s coming from. They bring in special gadgets and know-how to map out the problem.
Identifying Signs of Mold Growth
Your mold team looks for obvious and sneaky signs. You’ll spot black, green, or white splotches on walls or ceilings, but they’ll also sniff out musty smells or check for water stains and peeling paint.
Mold usually hides out in:
- Bathrooms and kitchens
- Basements and crawl spaces
- Attics and roof spaces
- Near windows and doors
- Behind big appliances
They’ll poke around rooms with poor airflow and damp corners. Some molds hide better than others, but a trained eye can usually track them down, even in tricky spots like carpet or wood.
Role of Moisture and Water Damage
Mold needs moisture. The inspector will hunt for leaks, dampness, and humidity that let mold thrive.
Leaks from pipes, roofs, or even just high humidity set the stage for mold. The inspector checks plumbing, roofs, and basements for any signs of water trouble.
Even tiny leaks behind a wall can cause big issues if you let them go. If the humidity’s over 60%, that’s a red flag – they’ll measure it in different rooms to see where things are off.
They’ll also watch for condensation on windows or pipes. Poor ventilation in kitchens or baths can make things worse.
Once they’ve found the moisture sources, they’ll use that info to plan how to fix the root of the problem – not just the mold itself.
Inspection Tools and Technologies
Inspectors don’t just rely on what they can see. Moisture meters help them find hidden water inside walls and floors without the need to rip things open yet.
Thermal cameras pick up temperature changes that point to damp spots or insulation problems. Cold patches? Probably trouble.
They might use air samplers to check what kinds of mold spores are floating around. Surface samples go to a lab to ID the exact mold types.
Sometimes, they’ll snake a tiny camera (a borescope) into walls to peek at hidden mold. These tools help them build a solid plan for tackling the mess.
Preparing for the Mold Removal Service
Before the crew arrives, you’ll want to pick the right company and get your place ready. A little prep can make the whole thing less chaotic.
Selecting a Mold Remediation Company
Not all mold companies are created equal. Make sure they’ve got the right licenses and certifications for your state.
What should you check for?
- Certified inspectors on their team
- Good insurance
- Experience with your particular mold issue
- References from folks they’ve helped recently
Ask for a detailed quote that spells out the steps – from inspection to removal to final checks. Don’t just go with the cheapest option or anyone promising overnight miracles.
Check their reviews and see what people are saying on the BBB. You want a company with happy customers and a solid reputation.
Make sure they follow industry best practices and use proper gear like HEPA filters. Safety should be a priority for them and for you.
Pre-Remediation Home Preparation
Before the crew walks in, you’ve got a few things to handle. Fix any leaks or moisture problems first – otherwise, the mold will just come back.
Here’s what you should do:
- Take your stuff out of affected rooms
- Clear paths for the team and their equipment
- Shut off HVAC systems in moldy areas
- Keep pets somewhere safe and away from the work zone
If you haven’t fixed that leaky pipe or roof yet, now’s the time. Move furniture and valuables out of the way so the crew can work safely.
Let your family know when and where the work’s happening. Some parts of the house might be off-limits for a bit.
Make sure the team can get their gear in easily. Mold removal tools like plastic sheeting, air scrubbers, and all the rest take up space.
Key Steps in the Mold Removal Process
The removal process follows a set order to keep you and your home safe. The pros use barriers, air cleaners, removal tools, and moisture control to get rid of mold for good.
Isolation and Containment Procedures
The team starts by building containment barriers around moldy areas. That keeps spores from sneaking into clean spaces while they work.
They’ll hang up plastic sheeting to seal off doors, vents, and any openings. Negative air pressure fans suck air out of the area, making sure nothing escapes.
Containment ramps up based on how bad things are:
- Small jobs: Simple plastic sheets
- Medium: Double barriers and airlocks
- Big jobs: Full containment with decon chambers
Everyone on the crew suits up – respirators, gloves, coveralls. They’ll also cover up your furniture nearby just in case.
HVAC systems get shut off so spores can’t travel through your vents. No shortcuts here.
Filtration and Air Cleaning
The pros run heavy-duty air filters the whole time. HEPA air scrubbers pull mold spores out of the air as soon as the team starts moving stuff around.
These machines grab tiny particles – down to 0.3 microns – with almost perfect efficiency. The crew sets up several units to keep air moving the right way.
The filters stay on during and after the work, making sure no stray spores settle on clean surfaces.
Typical air cleaning gear includes:
- HEPA air scrubbers
- Negative air machines
- Air movers for circulation
They keep an eye on air quality with particle counters and other gadgets, tweaking the setup as needed to keep things safe.
Removal and Cleaning of Affected Materials
The team pulls out anything that can’t be cleaned – think drywall, carpet, or insulation that’s been hit hard. They bag up the moldy stuff in thick plastic before carrying it out.
Stuff they usually remove:
- Drywall and ceiling tiles
- Carpet and padding
- Insulation
- Porous furniture and fabrics
For tougher surfaces like wood or concrete, they’ll scrub with antimicrobial cleaners. They make sure to treat everything so mold doesn’t come back.
All the removed junk goes straight into sealed containers for disposal. The crew follows local rules for getting rid of moldy waste – no cutting corners.
Drying and Dehumidification
Keeping moisture under control really matters if you want to keep mold from coming back. Remediation teams set up big fans and dehumidifiers to dry out every spot that got wet.
How long does it take? Could be several days as it all depends on how much water soaked in. Workers keep an eye on humidity with digital meters, making sure things are actually drying out.
Drying equipment includes:
- High-velocity air movers
- Refrigerant dehumidifiers
- Desiccant dehumidifiers for severe cases
They position fans to move air across wet surfaces, speeding up evaporation. Dehumidifiers pull moisture right out of the air, which helps things dry faster.
The team waits until moisture levels drop below 15% before starting reconstruction. Anything higher, and you’re just inviting mold back in.
Post-Removal Restoration and Prevention
Once the mold’s gone, your place probably needs some fixing up. Restoration repairs damage and stops future mold issues, which honestly gives you some peace of mind.
Repairing Water Damage and Replacing Materials
Water damage repair comes first, right after the cleaning crew finishes up. You’ll probably need to swap out anything that got too beat up by water or mold.
Common materials that need replacement include:
- Drywall and insulation
- Flooring and subflooring
- Baseboards and trim
- Ceiling tiles
Contractors usually put in mold-resistant products where they can. It’s a smart move, especially for spots that had trouble before.
Repairs only start once everything’s bone dry. Moisture meters confirm that walls, floors, and ceilings are safe before bringing in anything new.
At the same time, you’ve got to fix the source of water damage like patching leaks, sealing up cracks, and making sure water drains away from the house.
Ensuring Long-Term Mold Prevention
If you want to keep mold away for good, you have to control moisture. That’s really the biggest factor.
Key prevention measures include:
| Area | Action | Target Level |
|---|---|---|
| Humidity | Use dehumidifiers | Below 50% |
| Ventilation | Run exhaust fans | During cooking/showering |
| Maintenance | Check for leaks | Monthly |
Put in proper ventilation for bathrooms, kitchens, and basements. Good airflow keeps moisture from hanging around where it shouldn’t.
Stay on top of maintenance. Check your roof, plumbing, and basement for leaks every month. If you spot something, fix it right away before it turns into a bigger headache.
Don’t forget to clean out gutters and make sure water flows away from your foundation. Bad drainage can sneak up on you and cause more mold trouble.
Monitoring for Mold Reoccurrence
Keep an eye out for any signs that mold is creeping back in. Catching it early makes a huge difference.
Visual signs to watch for:
- Dark spots on walls or ceilings
- Discoloration around windows
- Peeling paint or wallpaper
- White or green fuzzy growth
Check these areas monthly:
- Bathrooms and kitchens
- Basements and crawl spaces
- Around windows and doors
- Near plumbing fixtures
If you notice a musty odor, don’t ignore it. Sometimes your nose picks up on mold before your eyes do.
Bring in a pro for a full inspection once a year. They’re trained to spot hidden mold you might miss.
Air quality testing can catch mold spores before you see any colonies. That’s extra important if someone in your house has allergies or breathing issues.
If you see warning signs, act fast. It’s way easier to handle a small patch of mold than another full-blown remediation job.
What to Expect After Mold Remediation
After your mold remediation team wraps up, you’ll want to make sure the job really got done right. Professional inspection and air quality testing confirm your home’s safe again.
Final Inspection and Air Quality Testing
The remediation service should do a clearance inspection once they finish. This step checks that all the mold’s really gone.
The technician looks for any mold they might’ve missed and checks that the original moisture source is fixed.
Air quality testing matters, too. They’ll collect air samples from the treated spots and compare them with outdoor samples. This tells you if mold spore levels are back to normal.
They might also take surface samples from walls or floors and send them to a lab.
You’ll get a written report with the test results. It’ll say if your indoor air meets safety standards. Most pros won’t call the job done until you pass these tests.
When to Contact the Mold Removal Service Again
If you smell musty odors again, call your mold removal service right away. That smell usually means mold is back, maybe in the same spot or somewhere nearby.
See new mold within a few weeks? Get them back in. Good companies usually guarantee their work and will return to fix it.
If anyone in your family starts having allergy or breathing problems again, don’t wait. Sometimes that’s the first sign mold wasn’t fully removed.
Water damage from leaks or floods needs immediate attention. New moisture can bring mold right back to places you just fixed.
If your humidity stays above 60% even after following their advice, call them. High humidity can undo all that hard work.
Frequently Asked Questions
Mold remediation costs depend on who’s responsible and what your insurance covers. The whole process – containment, removal, cleaning, and fixing things up – can take anywhere from a few days to a few months, depending on how bad the damage is.
Who is responsible for the costs of mold remediation?
Who pays? It depends on why the mold happened. If a covered event (like a burst pipe or a storm) caused it, your homeowner’s insurance might step in.
But if mold grew from neglect or skipped maintenance, you’ll probably pay out of pocket. Insurance usually won’t cover slow leaks or humidity problems you could have prevented.
Check your policy for mold coverage limits. Read the fine print and talk to your insurance rep before starting any work.
What factors influence the cost of mold remediation?
Size matters – the bigger the area, the more you’ll pay. More space means more materials, time, and labor.
The type of material also changes the price. Removing mold from drywall is cheaper than pulling it out of wood framing or HVAC systems.
How much damage there is tells you how much needs to go and get replaced. Mold that spreads across several rooms or floors will definitely cost more than a small patch.
If the mold’s in a crawl space or attic, expect higher labor costs. Those spots are tough to reach and need special equipment.
Can you explain the mold remediation process?
Here’s how it usually goes: First, pros seal off the affected area with plastic sheeting to keep spores from spreading.
Then they remove anything contaminated – drywall, flooring, even your stuff if it’s too far gone. Air filtration machines run the whole time to catch airborne spores.
After that, they spray antimicrobial solutions to kill what’s left. The area needs to dry out completely before anyone starts putting things back together.
Finally, they install fresh materials and restore the space. Some folks take this chance to upgrade materials while they’re at it.
How should I prepare my home for mold remediation?
Move your stuff out of the way before the crew arrives. That means furniture, clothes, valuables – anything that could get damaged or contaminated.
Make sure there’s a clear path from the door to the work area. The team needs space for their gear and to haul out debris.
If the mold’s in a bedroom or bathroom, you might need to stay somewhere else temporarily. Most of the time, you can stay home, but you’ll probably lose access to certain rooms.
Tell your insurance company before work starts. Snap some photos for your records if you’re planning to file a claim.
What is the typical duration of mold remediation?
Small jobs – less than a room – usually take one to seven days, start to finish. That includes removal, treatment, and basic repairs.
If several rooms are hit, expect a few weeks for full remediation and restoration. The schedule depends on how many rooms and what materials are involved.
Major damage across multiple floors or structural parts can take months. Those jobs are more complex and need more materials swapped out.
Sometimes material shortages or permits slow things down. Even the weather can drag out drying times.
What are the steps involved in professional mold removal?
First up, there’s the inspection and assessment. The pros check out the damage and come up with a plan that fits your situation. There’s no cookie-cutter solutions here.
Next, they tackle containment. They’ll seal off the area with plastic sheeting and set up negative air pressure, basically making sure spores don’t wander where they shouldn’t.
Then comes material removal. They pull out anything contaminated – drywall, insulation, maybe even some flooring – and get rid of it properly.
After that, it’s time for cleaning and sanitization. They use special solutions to kill off any stubborn mold spores. The area needs to dry out completely before anyone moves forward.
Finally, restoration wraps things up. The team brings in new materials and fixes everything up, aiming to make it look as good as – or honestly, sometimes better than – it did before.
Author: William Darnell
Hey ya'll. I'm William but most call me Bill. I've been a handyman for almost 30 years now and as age has crept up, I've decided more time at the desk sharing my knowledge is a good way to spend my free time so here we are!


Leave a Reply